Showing posts with label fashion. Show all posts

Saturday, May 11, 2013

The Great Gatsby DIY: Daisy's Earrings

Before I saw the new movie version of The Great Gatsby I was a little unsure how I would feel about it, given that it's my favorite book of all time.  (Did you know that I majored in English in college?  I read a lot.)  Anyway, I saw it yesterday and I absolutely loved it!  I loved that the script stayed so true to F. Scott Fitzgerald's words, I loved Leonardo DiCaprio's portrayal of Jay Gatsby, and I loved, loved, loved the aesthetics of it all!  Oh, the costumes!  The jewelry!!  The headpieces!!!

Image via Tiffany & Co.


I was particularly taken with the earrings that Daisy (a.k.a. Carey Mulligan, shown above with director Baz Luhrmann) wore for most of the second half of the movie.  Aren't they lovely?  I did a little digging and it turns out that Tiffany & Co created all of the jewelry for the movie in conjunction with Catherine Martin, who designed the costumes for the movie.  No wonder everything was so insanely sparkly.

Obviously I can't head over to my neighborhood Tiffany's and pick up a pair of those earrings, but I couldn't get them out of my mind.  I decided it was time for a good old fashioned DIY and I ended up making myself a pair of similar earrings for less than $10.

Supplies:
-  2 sparkly buttons (I got mine at Joann Fabrics where all buttons are on sale for 40% off right now.)
-  Silver lever earrings from the jewelry findings section of any craft store
-  Tape... I'll explain that in a minute.


Directions:
1.  Start with two buttons and two lever earrings.
2.  Place each button onto each lever earring, as shown.
3.  If the hole on the back of the button is significantly larger than the circumference of the earring like mine was, you'll need to use something to make the hole smaller so that the button doesn't flop around on the earring.  I tried several different fixes and realized that tape is the best option.  Roll a small log of tape with the sticky side facing in, then wrap that log in another layer of tape with the sticky side facing out.  Force the tape into the button hole.  Cut off the excess tape.  Push the earring through the tape-filled hole.  Now the button won't slide anymore.  There's an arrow pointing to the tape in the button hole in picture #3.  See it?
4.  Put on your earrings and feel glamorous like Daisy!


I thought it would be fun to model my new DIY earrings dressed in a full 1920s outfit like Daisy, but it just didn't feel authentic without a bob, and I am way too attached to my long hair for that.  I just modeled the earrings dressed as myself instead.


Have you seen the movie yet?  Did you like it?  How did you think it compared with the book?

Happy button shopping!
xoxo
Laura

Thursday, March 28, 2013

Lace Shorts

My friend, Larissa, gave me a pair of lace shorts.  I love them because I can dress them up and get away with wearing them instead of a skirt.


I also love that I'm seeing lace everywhere these days.  It's not just for figure skating dresses and your grandmother's shawls anymore!  (Just to be clear, I shamelessly love skating dresses and shawls; I'm just glad that lace has branched out to more that just those 2 categories.)

Here are some other great, modern lace items from around the web:


1.  The trellis lace tank would be easy breezy for spring.
2.  I love every little thing about this romper!
3.  The lace stilt jeans from Piperlime would add so much sass to my wardrobe.
4.  There's also a whole world of fun lace accessories out there, including these little hair bows.
5.  And the Penelope crochet overlay one piece swimsuit is seriously the ultimate swim suit.  I want it so badly!

Are you loving lace as much as I am these days?
xoxo
Laura

Thursday, March 7, 2013

Nautical Style

I accidentally fell in love with a super expensive swimsuit.  It's the Port Stripe Halter Bra swimsuit from Juicy Couture, and I think it is the perfect nautical fashion statement.  It has the classic nautical stripes, a cute little anchor on the front, and the ties in the back are made of white rope. Isn't it so fun?

Image via Juicy Couture


I'm loving all things nautical lately, though, so I'm not pulling out my wallet for that swimsuit yet.

To be clear, I'm loving fashion's whimsical take on the nautical theme, which is different from the industrial feel of actually living full time on a ship like I do.  While it's an adventure, the real ship life is not nearly as adorable; my uniform onboard is a bright blue polyester track suit.  Ugh.

Here are some other playful (non-track-suit) nautical pieces that I love:


1.  I love the red rope detail on these Valentino nautical ballet flats.
2.  The sparkles on this nautical sequin anchor tank from Delia's stand out in a very good way.
3.  This "life ring" from Asprey London is classy and cheeky at the same time.
4.  The fit and flare shape of Kate Spade's Mariella dress looks chic with a navy nautical stripe.
5.  I can't get enough of the watercolor details on the Candace Carryall by Coach.
6.  These bright red anchor earrings from River Island prove that the cutesy nautical vibe can also be affordable.

Do you love nautical fashion as much as I do?
xoxo
Laura

Sunday, February 24, 2013

The High-Low Dress

I have been admiring high-low dresses from afar for quite some time now.  Some examples of this short-in-the-front and long-in-the-back style are here, here, and here.

I'm happy to say that I finally joined in on the fun.


I bought an inexpensive summery version of the trend from Target that I think will be perfect to wear at the beach here in the Caribbean as well as back in Denver this spring.  (Speaking of which, I'm so glad it's almost spring!)

While the high-low dress's cut is similar to that of the mullet, I really don't think this is going to be a fleeting trend that everyone laughs about a decade from now.  I've been wrong before, though. What do you think?

xoxo
Laura

Sunday, February 3, 2013

Week in Review (Jan 27-Feb 2)

Here's a quick look back at some of the little things that made last week special:


Did you do anything fun this week?
xoxo
Laura

Friday, November 9, 2012

Interchangeable Embellished Collar


Lately I've been noticing girls wearing sweaters with Peter Pan Collars everywhere I turn. You can buy them on the internet here, here, here, and here, or you can make your own like I did! I don't love wearing polo shirts anymore, but I'm loving collared sweaters. With that in mind, I found an old polo shirt in my closet and I decided to cut off the collar and fix it up so that I could mix-and-match it with any of my sweaters.

I didn't buy anything for this project, I just used things I found around my house: an old polo shirt, a plastic necklace from my childhood, a pair of scissors, and a needle and thread.


Here's the scoop:


1.  Begin to cut off the neck of the shirt, being careful to leave one button and a couple of inches of fabric below the collar.

2.  Cut all the way around until the collar is detached from the shirt. Discard the rest of the shirt (or keep it for future DIY projects!).

3.  Fold over about 1/4 inch of fabric along the edge that you just cut and sew a hem. This will stop the fabric from fraying, so it's important not to skip this step. Feel free to do this with a sewing machine if you've got one handy, but you can totally sew it by hand like I did if you want to.

4.  Make a cut anywhere in the necklace so it becomes a long string of beads. Lay this string along the edge of the collar and begin to sew it down. To do the sewing, start by bringing the needle and thread up through the collar as close to the edge of the collar as possible.

5.  Pass the needle and thread over the string in between the first and second needs, then insert the needle down through the collar again on the other side of the beads. Repeat this sewing method, making one stitch between every single bead until you've covered the entire edge of the collar.

6.  Cut off the excess beads to finish the project.


Now you can put the collar on your neck, doing up the button to hold it in place, and then pull on your sweater over it, and no one will know that the collar isn't attached to either your shirt or your sweater! Because this collar is interchangeable, I'm excited to try out all the different sweaters (or dresses!) that I can wear it with. This outfit is only the beginning!


Happy sweater season!
xoxo
Laura

Sunday, September 16, 2012

This week I'm loving...

My Toms shoes!


I love that they're so comfy, and I love that the stripes have a nautical vibe, and most of all I love that my purchase helped a kid in need.  Don't know what I'm talking about?  Here is what Toms is all about.


What are you loving this week?
xoxo
Laura

Friday, September 7, 2012

Fashion's Night Out

Hi There, Fashionistas!

I'm back in Colorado, and last night I got to go to Fashion's Night Out in Boulder because my best friend, Karleen, was modeling in the show! Fashion's Night Out is an annual event with fashion shows and parties in cities all over the world.  The show in Boulder highlighted fashions available at local shops on and around Pearl Street.  I couldn't resist the opportunity to whip out my camera and take a few pictures.

Here are some of the highlights from the show:


Here's my personal pick for the boldest/most hilarious color combos:


And here is Karleen (on the far right) rocking her dress from Silhouette:


After the show, I went back to the Silhouette store with Karleen to have a little champagne and to check out the clothes.  I ended up really liking the store because they don't just sell pretty clothes, they sell pretty clothes that are eco-friendly and that come from designers with socially responsible business practices.  What does that mean?  It means they carry lines like EcoSkin, which makes organic dresses, and Ingenious Design, which manufactures fare-wage apparel in Peru.  I loved it because I know all about organic food but I had never really thought about how clothes can be organic as well. (Oh, and I'm not being paid by Silhouette.  I just think they're a cool company.)  If you want to check them out, you can go to their facebook page or follow them on twitter.

I hope you're having a fabulous (and fashionable) Friday!
xoxo
Laura

Saturday, November 26, 2011

Knitting for a European Winter Part 1: Manly Scarf


I don't think I've mentioned it, but this blog has officially gone on tour!  Right now we are in Utrecht, The Netherlands and while I like it here, it is also cold and foggy, which makes it perfect scarf weather.  I decided to make a simple striped scarf with fringe on the ends for my boyfriend. I let him pick out his colors and he picked white, green, and a greyish yarn that changes colors. Because he liked three colors, I ended up making white and green stripes with the color-changing grey yarn throughout the whole thing, which added a randomized pattern for a unique look.


I didn't use a pattern to make this scarf, I just knew I wanted big chunky stripes in stockinette stitch with a garter stitch edging, so I did the following:
  1. Use size 8 needles.  Hold the white yarn and the grey yarn at the same time, cast on enough stitches to make the scarf 10 inches wide.

  2. Knit the first row.

  3. On the second row, knit the first 3 stitches, purl all the middle stitches, knit the last 3 stitches.

  4. Repeat steps 2 and 3 until the scarf is 6 inches long.

  5. Cut the white yarn, leaving at least 6 inches to weave in later, and start using the green yarn for the next row.  Never cut the grey yarn as it will be used throughout the entire scarf.

  6. With the green and the grey yarns, repeat steps 2 and 3 again until you have 6 more inches of scarf.

  7. Then cut the green yarn, leaving at least 6 inches to weave in later, and switch back to the white yarn.

  8. Continue alternating the green and white yarn, making 6 inch stripes, until the scarf is 5 feet long.

  9. Cast off.


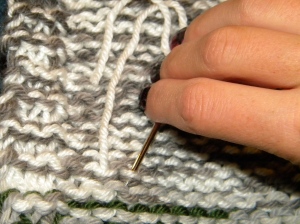
10. Weave in all the loose ends where you switched colors.


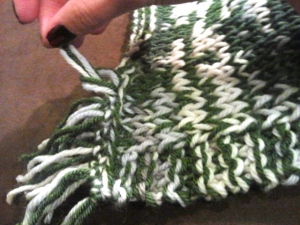
Now it's time for the fringe:
  1. Cut 6 inch strips of yarn.

  2. Use a needle to pull the strips through a loop on the edge.

  3. Make a slip knot.

  4. Repeat steps 1 through 3 until there is fringe all along the edge.
.

The final product looks like this:


Happy knitting!
xoxo
Laura

Monday, October 31, 2011

Happy Halloween!


About a week ago, I ran across this tu(tu)torial about making a tutu for a 1-year-old, and I wanted to make one for myself (because that's totally normal, right?), so I decided to be Black Swan for Halloween.

I already had all the necessary dancewear except for a tutu and a scary crown, so those are the only things I had to make.

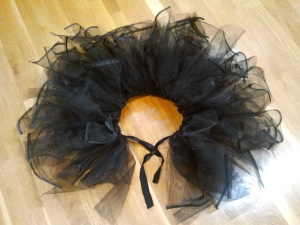
Here's how to make a tutu:


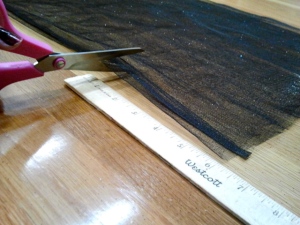
  • Gather up 8 yards of tulle, a ribbon to go around your waist, scissors, and a ruler.

  • Cut the tulle into 6-inch strips.

  • Cut some of the strips in half and the rest into thirds (to add extra poofyness, or you can make all the strips the same length if you want).

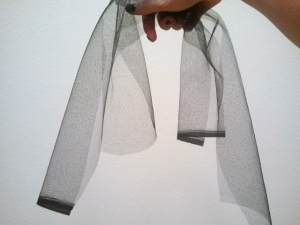
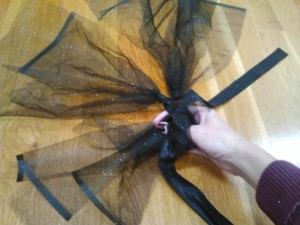
  • Take a half-length strip and a third-length strip, hold them together, fold them in half, and slip knot them onto the ribbon.

  • Continue adding strips to the ribbon until you've got a full tutu!

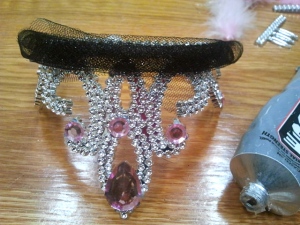
And here's how to Black Swan-ify a $1 children's pretty-pretty princess crown:


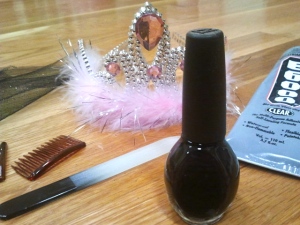
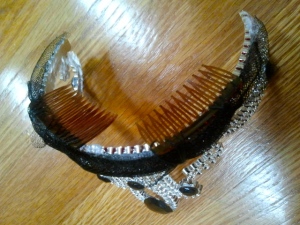
  • You will need the crown, a leftover piece of tutu tulle, glue, black nail polish, a nail file, and a couple of hair combs.

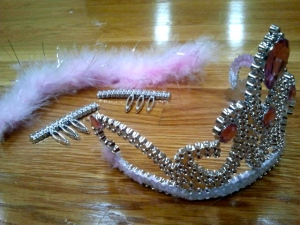
  • Break off the sides of the crown so it will sit on your head comfortably, then pull off the pink feathers.  Both of these are super easy to do if the crown is cheap.

  • Glue some black tulle where the pink feathers used to be.

  • Paint over the pink (fake) rhinestones with black nail polish.

  • Scuff up your hair combs with a nail file and then glue them onto the bottom of the crown so that it will stay on your head.

This is the final product, minus the makeup which I saved for the actual party:


And I'll leave you with the (always classy) mirror shot from the party!


Have a happy Halloween!
xoxo

Laura

Saturday, October 8, 2011

Lacy Gloves


The other day, I was in the Aldo Accessories store at the mall when I saw a pair of really cool gloves covered in lace.  They were pretty expensive for what I would actually be getting, though, and I realized that I could make these at home in any color I wanted for a lot less money.


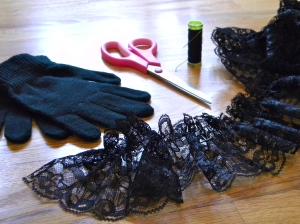
I only needed a few supplies for this project:
  • Scissors
  • A needle and black thread
  • A yard of stretchy lace from Hobby Lobby ($1.99)
  • A $2 two-pack of knit gloves from target (the black ones are shown here)


First, I cut a piece of lace that was long enough to wrap around the glove once, I matched up the edge of the lace with the wrist-edge of the glove and hand-sewed the lace all the way around.  This is what I got:


It was the tiniest wrist-hole ever, and I couldn't get my hand in the glove.

Once I learned that lesson, I put the glove on (so it would be appropriately stretched) and sewed on the lace while I was wearing it, like this:


Oh, did I fail to mention that I also made these gloves in pink?  I did, and they are my favorite.  The only difference was that I had to be a lot more careful with my stitches because the black thread is more noticeable against the pink gloves.

My lace wasn't thick enough to cover all the way from the wrist to the base of my fingers, so once I finished sewing the first round of lace, I cut a second round and sewed it on the part that was still bare.  I ended up being really happy with having two separate pieces of lace on each glove because the first round could go around the base of the thumb and the second round could go inside the thumb on the higher part of my hand, so I never had to cut a thumb-hole.  I repeated all these steps on three more gloves et voila!  Two pairs of shmancy gloves for a grand total of $3.99.  Love it.

Until next time,
xoxo
Laura
Related Posts Plugin for WordPress, Blogger...