Wednesday, June 13, 2012

Grownup Friendship Bracelets

Hello from Sandusky, Ohio!

I'm here all summer doing a really fun show at a really fun amusement park, and in one of the numbers in our show we get to dress up as ice skating crayons.  It's so funny!  Nothing gets me quite like dancing inanimate objects do.


In honor of our silly kids' number, for opening day I decided to make friendship bracelets for all my cast mates in their corresponding crayon colors.
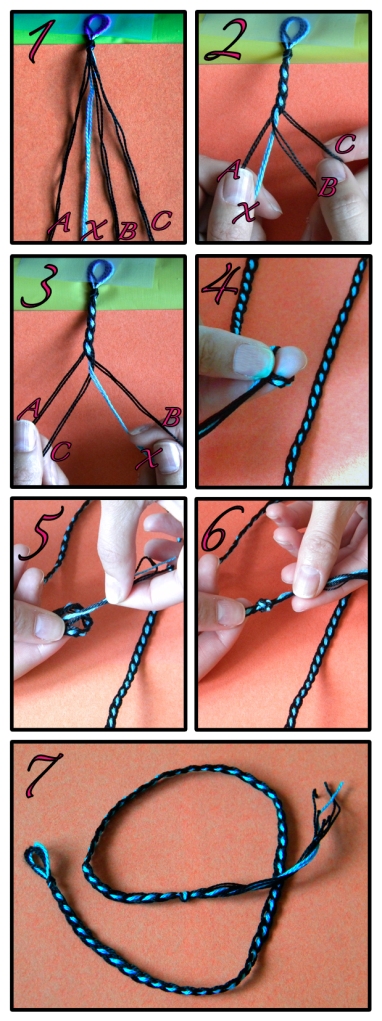


Here's How You Do It:

  1. Cut 3 strips of black embroidery floss and 1 strip of an alternate color to 40" each.  Fold each individual strand in half then put them all together and tie them in a knot where you folded them, leaving a small loop for later. Tape the loop to the edge of a table and separate the strands into 4 sets of 2 as shown. For instructional purposes let's call the black strands A B and C and the alternate color stand will be X.

  2. Bring C over B and under X.

  3. Bring A under C and over X.

  4. Repeat steps 2 and 3 until you have braided the entire length of string.  It helps me to say "over under, under over" while I'm doing the braiding.  It also helps to hold all four strings in your hands at once, keeping them taut.  Once you let a strand or two start dangling, it's harder to keep the braid straight and even. Now begin your knot by looping the braid around your finger.

  5. Pull the loose end through the loop.

  6. Pull the knot tight.

  7. You've made the bracelet!  I made all of my bracelets up to this point and then wrapped them up in the paper that crayons are wrapped in and brought them to work.  (The crayon paper was courtesy of my boyfriend, Justin, who is dressed up as the hunky orange crayon in the picture at the beginning of this post.)  Once I had given them to everyone, I sized them to their wrists and added the finishing touches.

Here's how to size and finish the bracelets:


1.  Wrap the bracelet around the recipient's wrist twice to measure how long it should be.

2.  Tie a knot in the bracelet to mark the spot where you want it to end.
3.  Cut off the original knot you tied at the end of the un-measured bracelet you made earlier.

4.  Separate the contrasting colored strands from the black strands. (In this case, the contrasting colored strands are the light blue ones.)

5.  Thread the contrasting colored strands through the holes of a small button.

6.  Thread the same strands through the button holes again so they end up on the underbelly of the button.

7.  Cut off all the excess strings so that they can only be seen beneath the button.

8.  Put a dab of Mod Podge or other clear-drying glue on the end of the strings on the underside of the button so the knot won't come undone later.

9.  Let it dry and you've now got a custom-sized grown-up bracelet for one of your friends!


Here's what a finished bracelet looks like:


Notice how the button that you attached to the end fits neatly through the loop that you made in the very first step when you started making the bracelet?  If your loop is too big, your button will slip back out of the loop while you're wearing it and the bracelet will fall off.  If you have that problem, just tie another knot next to the original knot at the base of the loop.  It will make the loop smaller.

Aren't these bracelets so fun?  They are basically just the same as the ones that I made when I was a kid, but the double-wrapping and the button add that little something extra that distinguishes the things we love as grownups from the things we loved as kids.

Until next time,
xoxo
Laura

Monday, May 14, 2012

Sock Buns!

Hola!

Have I mentioned that I'm in Mexico?  Acutally, I'm not just anywhere in Mexico; I'm in Villahermosa which is way down south near Guatemala and the equator, so it is super duper hot here.  And naturally our ice show is outside in the 100 degree heat.  Just doing our hair backstage makes us break a sweat, let alone actually skating in the show, so all the girls have started wearing our hair in braids and buns to keep it off of our sticky skin.  Last week, one of my friends borrowed another girl's hair donut to make a bun, but she didn't know how to use it, so I showed her.  That got me thinking about all the fun ways to wear your hair in a bun, so I decided to do a bun blog!  I don't have a donut here with me, but that's no problem at all because you can make an equally great bun with a sock.  Just cut a hole in the toe area, roll it up on itself until it is the shape of a donut and you're ready to roll.  It's preferable to use a sock that's similar to your hair color, but I used a colorful one for these tutorials so you can see it better.

Here's what a basic sock bun looks like:


And here's how you do it:


1.  Put your hair in a ponytail.

2.  Put your rolled-up sock over your ponytail holder.

3.  Pull the sock down to the bottom of your hair.

4.  Begin to roll your hair around the sock by turning the sock-donut inside out over and over again while it rolls up your hair.

5.  Roll...

6.  it...

7.  up!

8.  Once all your hair is rolled over the sock and it's on the top of your head, make any necessary last minute adjustments, tuck in any rogue hairs that may be sticking out, and put a rubber band around the whole thing to hold it in place.

Now that you know how to do a basic sock bun, there are a million different ways to wear it and make it your own.  I've done a few variations here on this blog, but the beauty of these buns is that you can make up all sorts of different ways to wear them yourself.  Anything that involves a ponytail can also involve a sock bun, so get creative!


Here's a basic sock bun with a braid wrapped around it:


And here's how you do it:

1.  Put your hair in a ponytail, pull a small-ish section of hair from the ponytail off to the side and clip it out of the way for safe keeping.

2.  Roll the rest of your ponytail (that you didn't clip to the side) up into a sock bun.

3.  Secure the sock bun with a rubber band.

4.  Un-clip the section of hair that you saved for later and braid it.

5.  Loosely wrap the braid around the base of the sock bun.

6.  Secure the braid with a bobby pin and you're all finished!


Here is a low bun with the sides all twisted up so your hair stays out of your face:


And here are the directions:


1.  Make a part and twist your hair away from your face on one side, starting up near your part and moving down.

2.  Secure the hair you just twisted with a clip so that you can come back to it later.

3.  Now twist the other side of your hair so it matches the first side.

4.  Take out the clip you used earlier and put all of your hair in a low ponytail, being careful not to un-twist all the hair you just twisted.

5.  Turn the ponytail into a sock bun.

6. Secure the bun with a ponytail holder.

And now it's time for my personal favorite...


The upside down braid into a high bun:


Here's how you do it:


1.  First of all, take a deep breath and believe in your braiding ability, because french braiding upside down is not as hard as it looks.  Then flip your head upside down and give it a go, starting the braid as close to the nape of your neck as possible.

2.  Continue your french braid until you are about even with the top of your ears.

3. Stop french braiding but continue a regular braid up about 2 more inches so you'll have some extra braid to work with if you need it.

4.  Pull the rest of your hair into a ponytail with the braid.

5.  Stand back upright and secure the ponytail with a ponytail holder.

6.  Make your sock bun, secure it with another ponytail holder and you've done it!  Yay!


I really hope this blog helps spread the sock bun fun!
xoxo
Laura

Monday, April 23, 2012

No-Sew T-Shirt to Tank Top Project


Hola from Mexico!

A couple days before I flew down here, I was doing a little blog browsing when I ran across a really cool tutorial for making a cute gym tank top out of an old t-shirt, which is totally perfect for me because I exercise a lot and designer workout gear is anything but cheep.  Anyway, I found the tutorial on a really cool site called Blogilates that's full of free pilates videos, tips for healthy eating, cute exercise attire, and general inspiration for living a healthy, active lifestyle.  I highly recommend it.

I decided to make my tank top out of a t-shirt that I got for free on opening night of the movie "Whip It" that is extremely large on me and, therefore, only acceptable to be worn as an inspirational nightshirt, which is a shame because I really like the message on the front.  All I needed to transform this t-shirt was a pair of scissors.

So here's how I did it:


1.  Cut off the sleeves of the t-shirt.

2.  Cut off the neckline.

3.  Cut off the bottom of the shirt, including at least a half inch of fabric above the hem.

4.  Cut a v into the back of the neckline, then flip the shirt over and cut a deeper rounded neckline into the front as well, if you would like.  This is also a good time to decide how thick you want the shoulder straps to be and re-cut the sleeves accordingly.

5.  Cut the seams from the strip of fabric that you cut off the bottom of the t-shirt so all you have left is a seamless fabric strip.  Stretch that strip out.

6.  Tie that strip of fabric in a knot around the straps in the back of the shirt, then wrap the strip around and around the straps and tie another knot at the other end.

¡Está hecho!  A new tank top is born!  Once I tried mine on, I pulled down on the bottom of the tank and it stretched out the shoulder straps a little bit which made the whole thing the perfect length.

Here is the final product:


Don't forget to check out Blogilates!
Happy exercising!
xoxo
Laura

Wednesday, March 14, 2012

A Rhinestone Headband

Hola from Miami!

I'm here doing a show for about a month, soaking up the sun and browsing crafting blogs (I can't help myself), and that is how I stumbled across Anne Weil's blog Flax & Twine.  I particularly loved her blog about making sparkly headbands, which you can find here, so I decided to try it myself!

 Here is the super-awesome result:


These are the things I used:
  • Plastic headband
  • Embroidery thread
  • Rhinestone trim (I found mine for $3 in the craft section at Walmart)
  • Glue (E6000!)
  • Old magazines to cover my work surface (E6000 is messy)
  • Scissors

This is how I made it:

To start, I covered my table with magazines and glued the end of the thread onto the inside of one end of the headband.


Then I wrapped the thread around the headband over and over to cover it up.


At the top of the headband where there are teeth, I wrapped the thread between each tooth twice and didn't worry about the headband showing because it gets fully covered later on.


When I got to the other end of the headband, I glued the thread to the inside of the headband and cut off the excess.


Then it was rhinestone time!  I laid them over the headband, checking to make sure they were centered, and then I glued on the end of another piece of thread and began wrapping it just like before.  For continuity, I wrapped the thread 4 times in between each rhinestone.


I continued wrapping the thread until I got to the end of the string of rhinestones and then I glued the thread in place and cut it off.


And that was that!  The whole project only took about an hour, and I would highly recommend trying it yourself as well as checking out all the other cool tutorials on Flax & Twine.


Now I'm headed back out to the pool!
xoxo
Laura

Wednesday, February 22, 2012

A Colorful French Manicure

Hi There Everyone!

After three months of tour, I am back home in good old Colorado.  I didn't realize how used to cloudy weather I had become in England until I walked out of DIA yesterday and the sun was shining in the sky and bouncing off of leftover snowbanks and instantly lighting up my mood.  With all this brightness in mind, I decided to do a colorful manicure, so I gave myself an at-home french manicure using pink nail polish instead of white.


If you are also in the mood for a little February pick-me-up, here is how you can do it to:

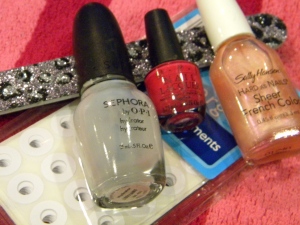
Things you will need:
  • Nail file
  • Hole punch reinforcements
  • Clear base coat nail polish
  • Bright pink nail polish (or try another fun color)
  • Sheer pinkish top coat
  • Nail polish remover
  • Small brush

How to do it:

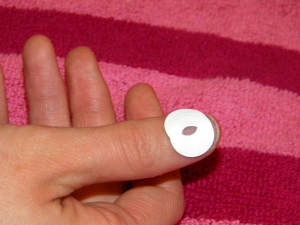
Prepare your nails by filing them, painting them with the base coat, and letting them dry fully.  Once that is done place the hole punch reinforcements on your fingers, leaving the amount of room between the sticker and the tip of your nail that you would like to be pink.  On your thumb, you may have to use multiple stickers like I did.


Now paint the tips of your fingers with the pink nail polish, making sure that the sticker is firmly pressed into your nail to help stop the polish from seeping under the sticker.


Now you can remove the stickers and clean up any stray pink polish with a small brush that has been dipped in nail polish remover.


Let the pink polish fully dry, then paint over your whole nail with a sheer pinkish top coat.


Let them dry and you're all finished!


Happy painting!
xoxo
Laura
Related Posts Plugin for WordPress, Blogger...