Monday, October 31, 2011

Happy Halloween!


About a week ago, I ran across this tu(tu)torial about making a tutu for a 1-year-old, and I wanted to make one for myself (because that's totally normal, right?), so I decided to be Black Swan for Halloween.

I already had all the necessary dancewear except for a tutu and a scary crown, so those are the only things I had to make.

Here's how to make a tutu:
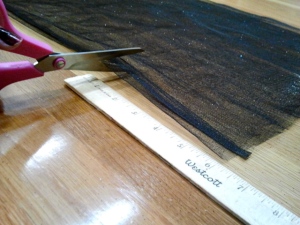

  • Gather up 8 yards of tulle, a ribbon to go around your waist, scissors, and a ruler.

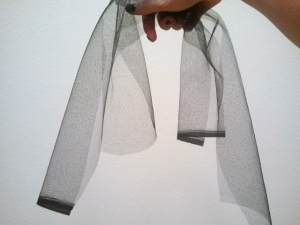
  • Cut the tulle into 6-inch strips.

  • Cut some of the strips in half and the rest into thirds (to add extra poofyness, or you can make all the strips the same length if you want).

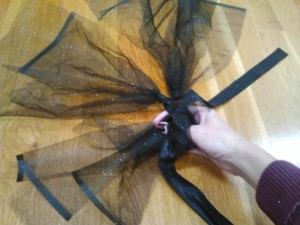
  • Take a half-length strip and a third-length strip, hold them together, fold them in half, and slip knot them onto the ribbon.

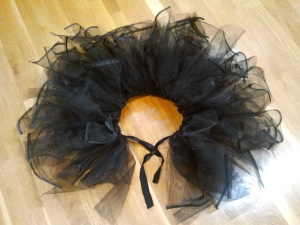
  • Continue adding strips to the ribbon until you've got a full tutu!

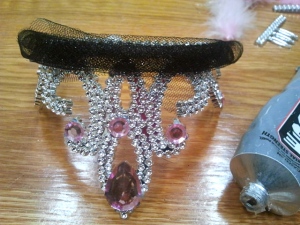
And here's how to Black Swan-ify a $1 children's pretty-pretty princess crown:
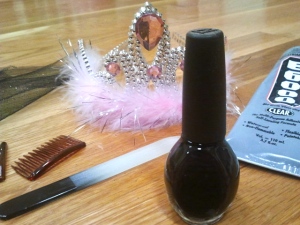


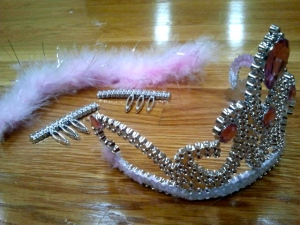
  • You will need the crown, a leftover piece of tutu tulle, glue, black nail polish, a nail file, and a couple of hair combs.

  • Break off the sides of the crown so it will sit on your head comfortably, then pull off the pink feathers.  Both of these are super easy to do if the crown is cheap.

  • Glue some black tulle where the pink feathers used to be.

  • Paint over the pink (fake) rhinestones with black nail polish.

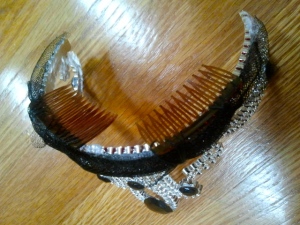
  • Scuff up your hair combs with a nail file and then glue them onto the bottom of the crown so that it will stay on your head.

This is the final product, minus the makeup which I saved for the actual party:


And I'll leave you with the (always classy) mirror shot from the party!


Have a happy Halloween!
xoxo

Laura

Monday, October 24, 2011

Cutesy Tools: How to Decoupage a Screwdriver

I work in a field where I occasionally need a screwdriver, and I bought a new one last weekend.  It is a perfectly functional tool so, rationally, I know that it is just as good as the one I was replacing, but the one I was replacing was pink.  This one is not.  Clearly, the only remedy for this situation was a craft project.

These are the things you will need to decoupage a screwdriver:
  1. A screwdriver
  2. A metal file
  3. Scissors
  4. Magazines (or another source of pictures)
  5. Mod Podge or other decoupage glue
  6. A brush for the glue (I used an old toothbrush)

And here is how you do it:

First, you will need to scuff up the hard plastic handle in order to create a porous surface for the glue to adhere to.  If you skip this step, your pictures will end up peeling right off the hard plastic as soon as the glue dries.


Then cut out some fun pictures from magazines.  An example is this hilarious selection of animals that I found in Martha Stewart Living:


Now you are finally ready for the decoupaging!  Make sure you cover your workspace with something like newspaper (or in my case, a paper bag) because this project gets very messy very fast.


Use your brush to coat the handle of the screwdriver in glue, then stick the photos all over it.


The reason why I love using Mod Podge glue is because it doubles as the glue and the sealant in one.  This way, once you finish sticking on all the photos, all you have to do is cover the whole thing in one more coat of the Mod Podge and leave the project to dry.


I did this project in the morning, left it out to dry while I was gone all day, and when I came home it looked like this:


I absolutely love it and I hope you do to!
xoxo
Laura
Tuesday, October 18, 2011

Pink/Black Nail Art

A couple of months ago, I was minding my own business, about to walk into Ikea (which I love), when I rudely slammed my finger in my car door.  It was pretty messed up so I wore a splint on it for a few weeks.  Now that the splint is off, I sort of miss it because it hid my impressively black and blue nail.  But now that the nail is out in the open in all its glory, I'm thinking the only cure for it is nail art!

I did a little blog surfing and settled on a "fade to black manicure" that I found at Runway DIY.  Here's how I did it:

1.  Start with unpolished nails (even if they're scary like mine)


2.  Paint them pink (or the non-black color of your choice)


3.  Dab a teensy bit of black nail polish onto the base of the nail, then immediately paint over it with a clear top coat while the black polish is still wet.  This step will turn your top coat's brush black, so make sure it's a cheap one that you don't care too much about.


And then you're finished!  The hardest part for me was trying to apply the same amount of black to each nail so that it would spread out the same way every time I brushed the top coat over it.  At fist I was a little bit frustrated that I couldn't make all my nails look the same, but by the fourth nail I had embraced the idea that it was more artsy if each nail looked unique.


I thought this was so fun that I'm thinking you will definitely be seeing more nail art from me in the future!

Until then,
xoxo
Laura
Sunday, October 16, 2011

(Gluten-Free) Pumpkin Cookies


Fall has always been my favorite time of year, and one of the reasons why is all the yummy food.  (Two words: Halloween, Thanksgiving.  Enough said.)  Every fall, for as long as I can remember, my mom has baked her homemade pumpkin cookies and I love them with all of my heart.  Today, I decided to try to make them myself!


That is a picture of my mom's recipe.  It changed slightly a few years ago when I found out that I couldn't eat gluten anymore, but all my mom did was replace the flour with a gluten-free flour mix.  If you are a gluten eater and you would like to make this recipe, regular flour will still work great.


Ingredients:
  • 1 cup shortening
  • 3/4 cup sugar
  • 1 egg
  • 1/2 teaspoon orange extract
  • 1/2 teaspoon vanilla
  • 1 cup canned pumpkin
  • 1 3/4 cups gluten-free flour mix (make sure it includes either xanthan gum or guar gum for texture)
  • 1 teaspoon baking powder
  • 3/4 teaspoon salt
  • 1/2 teaspoon pumpkin pie spice


Directions:                                                                                                                          
  • Preheat oven to 350 F.
  • Cream shortening and sugar until fluffy.
  • Beat in egg, orange extract, and vanilla.
  • Stir in pumpkin.
  • Sift together flour, baking powder, salt, and pumpkin pie spice.
  • Add flour mixture to egg mixture, mixing well.
  • Drop by rounded tablespoons onto greased baking sheet.
  • Bake at 350 for 12 to 15 minutes.


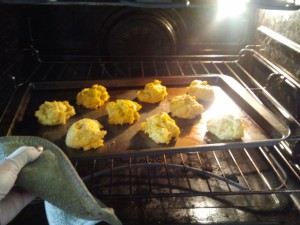
Today's batch turned out delicious, and now the house smells great.

I'm calling it a success.
xoxo
Laura

Saturday, October 8, 2011

Lacy Gloves


The other day, I was in the Aldo Accessories store at the mall when I saw a pair of really cool gloves covered in lace.  They were pretty expensive for what I would actually be getting, though, and I realized that I could make these at home in any color I wanted for a lot less money.


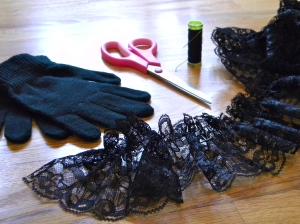
I only needed a few supplies for this project:
  • Scissors
  • A needle and black thread
  • A yard of stretchy lace from Hobby Lobby ($1.99)
  • A $2 two-pack of knit gloves from target (the black ones are shown here)


First, I cut a piece of lace that was long enough to wrap around the glove once, I matched up the edge of the lace with the wrist-edge of the glove and hand-sewed the lace all the way around.  This is what I got:


It was the tiniest wrist-hole ever, and I couldn't get my hand in the glove.

Once I learned that lesson, I put the glove on (so it would be appropriately stretched) and sewed on the lace while I was wearing it, like this:


Oh, did I fail to mention that I also made these gloves in pink?  I did, and they are my favorite.  The only difference was that I had to be a lot more careful with my stitches because the black thread is more noticeable against the pink gloves.

My lace wasn't thick enough to cover all the way from the wrist to the base of my fingers, so once I finished sewing the first round of lace, I cut a second round and sewed it on the part that was still bare.  I ended up being really happy with having two separate pieces of lace on each glove because the first round could go around the base of the thumb and the second round could go inside the thumb on the higher part of my hand, so I never had to cut a thumb-hole.  I repeated all these steps on three more gloves et voila!  Two pairs of shmancy gloves for a grand total of $3.99.  Love it.

Until next time,
xoxo
Laura

Saturday, October 1, 2011

The Beginning

I understand exactly how I became the way I am, but that doesn't mean that I'm a huge fan of it.  What I am is a 27-year-old consumer.  I'm active and social; I love going out with my friends on hikes or to the movies or to cool shops and restaurants, but all of those activites involve taking things in as opposed to putting things out into the universe.  Of course I became this way because that's how most unmarried 20-something Americans are today, with home economics being a thing of the past in schools, and the internet providing hours of passive entertainment while advertisements are constantly telling us to buy, buy buy, and I've never really though about it.

Two incidents made me notice and want to change the fact that I don't add nearly as many tangible things to the world as I take from it.  First, as usual, my mother pointed it out to me.  My fantastic boyfriend altered a dress for me to wear to a wedding (have I mentioned that he's fantastic?!) and I was making cookies for him as a thank you, when my mom made a joke about how that is literally my only "domestic" skill.  I was indignant and tried to think of a comeback but I honestly didn't have one.  She was right.  I don't know how to make anything else.  Then, a couple weeks later, my mom invited me to take a knitting class with her, I successfully completed the project, and I had an unexpected sense of accomplishment.  I had always thought of knitting as making boring scarves and potholders, but I had made something that I actually liked and that I would use!  Suddenly I wanted to make more things, other things, bigger and better things!  I wanted to take more classes!  I wanted to give these things to my friends!  I would be THAT friend!  I would be a better and more sparkly version of myself!

A few hours later, once the excitement had worn off, I came back down to earth and remembered that I am a busy girl in a modern world who -- let's be honest -- tends to lack followthrough despite having the best of intentions.  So that's where this blog comes in.  I've decided to try to make one crafty thing per week and see where it takes me.  These will not be earth-shattering creations, but they will be things that I like and that are also fun and useful in real life.  I hope I can do it, and I hope that other people out in the internet-world might enjoy reading about my projects and maybe even try to make them too.

All I can do is try, right?
xoxo
Laura
Related Posts Plugin for WordPress, Blogger...