Monday, April 23, 2012

No-Sew T-Shirt to Tank Top Project


Hola from Mexico!

A couple days before I flew down here, I was doing a little blog browsing when I ran across a really cool tutorial for making a cute gym tank top out of an old t-shirt, which is totally perfect for me because I exercise a lot and designer workout gear is anything but cheep.  Anyway, I found the tutorial on a really cool site called Blogilates that's full of free pilates videos, tips for healthy eating, cute exercise attire, and general inspiration for living a healthy, active lifestyle.  I highly recommend it.

I decided to make my tank top out of a t-shirt that I got for free on opening night of the movie "Whip It" that is extremely large on me and, therefore, only acceptable to be worn as an inspirational nightshirt, which is a shame because I really like the message on the front.  All I needed to transform this t-shirt was a pair of scissors.

So here's how I did it:


1.  Cut off the sleeves of the t-shirt.

2.  Cut off the neckline.

3.  Cut off the bottom of the shirt, including at least a half inch of fabric above the hem.

4.  Cut a v into the back of the neckline, then flip the shirt over and cut a deeper rounded neckline into the front as well, if you would like.  This is also a good time to decide how thick you want the shoulder straps to be and re-cut the sleeves accordingly.

5.  Cut the seams from the strip of fabric that you cut off the bottom of the t-shirt so all you have left is a seamless fabric strip.  Stretch that strip out.

6.  Tie that strip of fabric in a knot around the straps in the back of the shirt, then wrap the strip around and around the straps and tie another knot at the other end.

¡Está hecho!  A new tank top is born!  Once I tried mine on, I pulled down on the bottom of the tank and it stretched out the shoulder straps a little bit which made the whole thing the perfect length.

Here is the final product:


Don't forget to check out Blogilates!
Happy exercising!
xoxo
Laura

Wednesday, March 14, 2012

A Rhinestone Headband

Hola from Miami!

I'm here doing a show for about a month, soaking up the sun and browsing crafting blogs (I can't help myself), and that is how I stumbled across Anne Weil's blog Flax & Twine.  I particularly loved her blog about making sparkly headbands, which you can find here, so I decided to try it myself!

 Here is the super-awesome result:


These are the things I used:
  • Plastic headband
  • Embroidery thread
  • Rhinestone trim (I found mine for $3 in the craft section at Walmart)
  • Glue (E6000!)
  • Old magazines to cover my work surface (E6000 is messy)
  • Scissors

This is how I made it:

To start, I covered my table with magazines and glued the end of the thread onto the inside of one end of the headband.


Then I wrapped the thread around the headband over and over to cover it up.


At the top of the headband where there are teeth, I wrapped the thread between each tooth twice and didn't worry about the headband showing because it gets fully covered later on.


When I got to the other end of the headband, I glued the thread to the inside of the headband and cut off the excess.


Then it was rhinestone time!  I laid them over the headband, checking to make sure they were centered, and then I glued on the end of another piece of thread and began wrapping it just like before.  For continuity, I wrapped the thread 4 times in between each rhinestone.


I continued wrapping the thread until I got to the end of the string of rhinestones and then I glued the thread in place and cut it off.


And that was that!  The whole project only took about an hour, and I would highly recommend trying it yourself as well as checking out all the other cool tutorials on Flax & Twine.


Now I'm headed back out to the pool!
xoxo
Laura

Wednesday, February 22, 2012

A Colorful French Manicure

Hi There Everyone!

After three months of tour, I am back home in good old Colorado.  I didn't realize how used to cloudy weather I had become in England until I walked out of DIA yesterday and the sun was shining in the sky and bouncing off of leftover snowbanks and instantly lighting up my mood.  With all this brightness in mind, I decided to do a colorful manicure, so I gave myself an at-home french manicure using pink nail polish instead of white.


If you are also in the mood for a little February pick-me-up, here is how you can do it to:

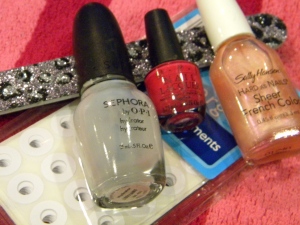
Things you will need:
  • Nail file
  • Hole punch reinforcements
  • Clear base coat nail polish
  • Bright pink nail polish (or try another fun color)
  • Sheer pinkish top coat
  • Nail polish remover
  • Small brush

How to do it:

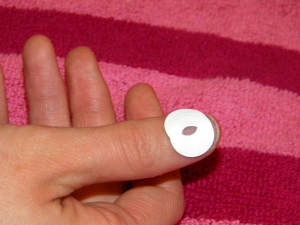
Prepare your nails by filing them, painting them with the base coat, and letting them dry fully.  Once that is done place the hole punch reinforcements on your fingers, leaving the amount of room between the sticker and the tip of your nail that you would like to be pink.  On your thumb, you may have to use multiple stickers like I did.


Now paint the tips of your fingers with the pink nail polish, making sure that the sticker is firmly pressed into your nail to help stop the polish from seeping under the sticker.


Now you can remove the stickers and clean up any stray pink polish with a small brush that has been dipped in nail polish remover.


Let the pink polish fully dry, then paint over your whole nail with a sheer pinkish top coat.


Let them dry and you're all finished!


Happy painting!
xoxo
Laura

Monday, January 30, 2012

Origami Heart Bookmarks

It's only January, but there is Valentine's Day in there air everywhere I go lately. Unfortunately it's been following my boyfriend around as well, and he never fails to mention that he hates the holiday. It's not because he's a scrooge or anything, it's simply because he doesn't like that it's such a "Hallmark Holiday." I am not a V-Day hater myself, but I really do see his point, so I started trying to think of ways to de-consumerize the holiday. That's when Pinterest led me to this really great blog about making origami hearts. I tried making them and they're just as cute as I thought they would be.  See?


Here's how you do it:

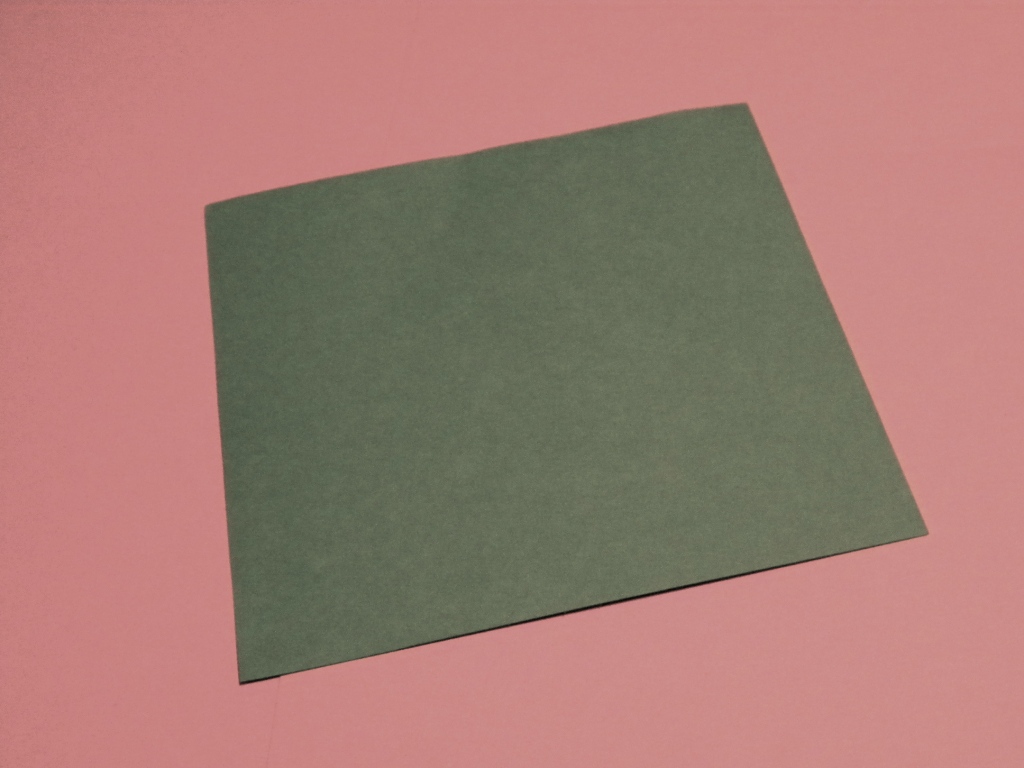
1.  Start with a square piece of paper.


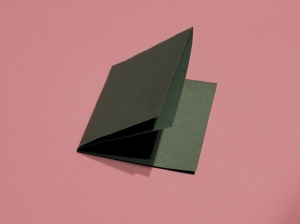
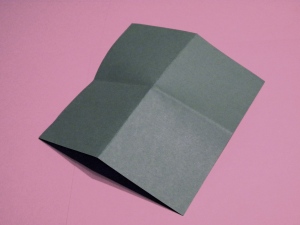
2.  Fold the paper in half, then fold it in half again.
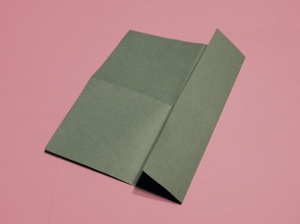
3.  Open the paper, then fold the bottom portion to the middle crease.
4.  Turn the paper over and fold up triangular edges.  Then turn the paper over again and fold the point of the triangle up to the top of the paper.
5.  Turn the paper over again so it looks like this:


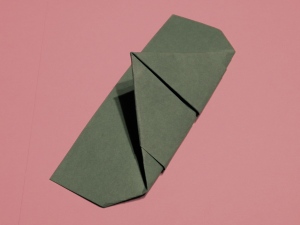
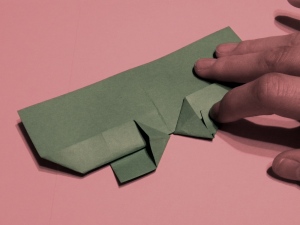
6.  Use your finger to make an opening, then flatten the opening to form a triangle.  Repeat this on the other side as well so it's symmetrical.
7.  Fold a triangle from the edge on both sides.
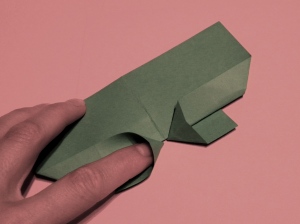
8.  Fold a mini triangle from each peak.
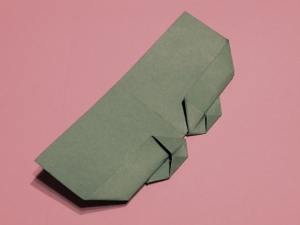
9.  Turn the paper over and you'll see the beginnings of a heart.


10.  Fold the rectanglular paper in so that it forms a square behind the heart, then fold those squares into triangles so that they are hidden behind the heart.
Et voila!  Your heart should look like this:


You can make these little guys in any color or size, and if you don't feel like using them as bookmarks, you can put them together to make a heart-flower:


Or you can just leave a pile of little origami hearts on your table like this:


Any way you fold it, it's going to be cute.
xoxo
Laura

Sunday, January 22, 2012

Headband Curls

Have you heard of Pinterest?  I'm assuming the answer is yes because I'm pretty sure I'm one of the last people on this bandwagon, but if you haven't checked it out, it's a really cool website where you can create pinboards of things you've found on the internet.  I've started using it to find and keep track of all sorts of things I'd like to try making (and subsequently blogging about right here).  One of the things I'm really loving on Pinterest is all the pictures of cool hairstyles.  I have long hair, and I love creating fun hairstyles, so I'm going to start trying out the styles I find and blogging about the good ones.

Today I'm going to write about some fun curls that I found a picture of on Pinterest that originally came from this youtube video.  These curls are great because they require no heat so they won't damage your hair.  The only downside to them is that the results are a little unpredictable as it is difficult to make all the curls exactly the same.

Start by brushing and parting your air-dried hair.


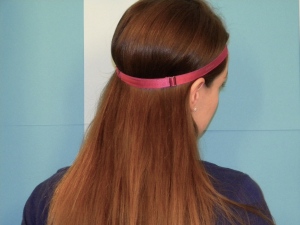
Place a stretchy headband over your hair.
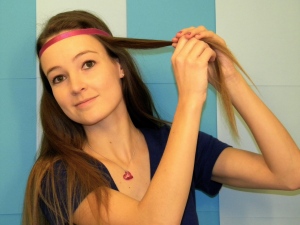
Starting on one side of your part, pull a small section of hair up and around the headband.
Continue wrapping strands around the headband until you've finished half of your hair.

Do the exact same thing to the other side of your hair, leaving a gap on the back of the headband so there will be room for the last step.

Finally, when you get to the last strand, wrap it around the headband multiple times and then tuck in the last little bit.  (This is what you were leaving room for in the last step.)
And now it's time to leave your hair alone and go to sleep (or wear it around all day because it really is kind of cute).


When you wake up in the morning, take the headband out of your hair and you'll be all wild and curly (and in my case, sleepy)  like this:

This was a really fun project for me, so I hope you liked reading about it!

Also, if you are a member of Pinterest and want to check out my pins, you can find them here.

Happy curling!
xoxo
Laura
Related Posts Plugin for WordPress, Blogger...