Showing posts with label t-shirt cutting. Show all posts

Friday, April 11, 2014

5 Spring Crafting Ideas


Since spring is finally in full bloom, I thought I'd do a roundup of my five favorite springtime crafts from blog posts gone by.

I feel like spring is the perfect time to refashion old clothes so they'll be more breezy, to make cute new accessories for freshly-bared arms, and to collect as many budding flowers as possible.

1.  Bust out those scissors and make a side-tie t-shirt.  It'll look great with a new swimsuit peeking out of the sides.


2.  Create your own beaded wrap bracelets.  They can cost a fortune if you buy them in stores and only a fraction of that if you make them yourself.


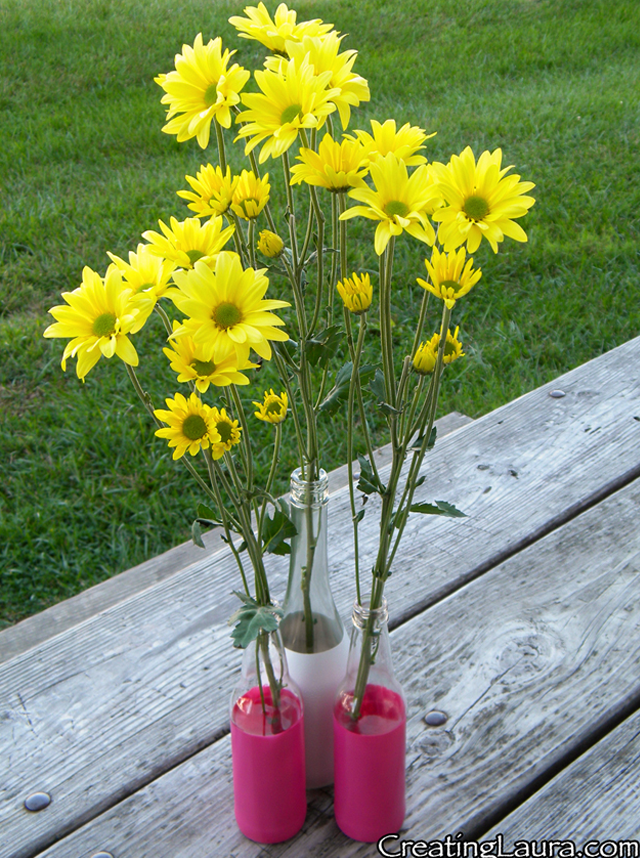
3.  Reuse old bottles to make painted bottle vases.  The flowers will look beautiful inside on the mantle or outside on a picnic table, plus the Earth will thank you for upcycling your trash.


4.  Use some scissors and glue to fashion a bow-back tank top.  It's perfect for the weather that's finally warming up.


5.  Embrace the arm knitting trend and make The Triplet Shawl.  It's perfect for wrapping over a swimsuit at the beach.


However you choose to celebrate the changing of the season and the long-awaited arrival of warmer weather, I hope you're loving it.

Happy spring!
xoxo
Laura

Friday, May 31, 2013

DIY Side-Tie T-Shirt Remix


I was in Victoria's Secret last week and they were selling tank tops with the sides slit open and little bows holding them together at the bottom.  I thought they were super cute, but pretty expensive for a shirt that doesn't even cover your torso, so I busted out my scissors and made my own.

I made mine with rehearsals in mind, and I wore it yesterday and loved it.  It's the perfect shirt to throw on over a leotard.


You'll only need two supplies to make this look: a t-shirt that's a little bit too big for you and a pair of scissors.

Here are the directions:


1.  Starting just inside the seam where the right sleeve meets the shirt, cut straight down the side of the shirt until you're almost at the bottom.  Try to leave a little wing of fabric sticking out at the bottom; you'll use that fabric to tie a bow later.  Repeat this on the left side.

2.  Cut off the bottom of the shirt to make it your desired length.  Instead of cutting straight across, though, start at the bottom seam and cut a sideways D shape, as pictured above.  This way you'll have nice and long strips of fabric to tie the bows with later.

3.  This step is optional.  I cut off the neckline of my t-shirt to give it a more easy-breazy feel. Don't cut too low though, because you'll already be showing a ton of skin on the sides, and you'll (hopefully) want to leave something to the imagination.

4.  Use the dangling fabric pieces to tie bows at the bottom of the side slits.

That's it!  It only took me 5 or 10 minutes to make this shirt, and I can tell I'm going to get a lot of wear out of it between skating and beach/pool days this summer.  I think it looks really cute with a frilly swim suit peeking out the sides.  Maybe don't wear this to Grandma's house though, ok?


Happy cutting!
xoxo
Laura

Wednesday, May 1, 2013

No-Sew T-Shirt Bow Sleeves


I'm very excited to share this t-shirt project with you guys today! I came up with the idea a whole month ago while I was still on the ship and I didn't have time to execute it until now.

Now is a funny time, however, because it's snowing like crazy here (in May!).

I started this project yesterday, and while I was working on it, I came up with a fun idea to take pictures of it outside in the sunshine.  I wanted to let the glue dry overnight before I took those pictures, though, and man was I surprised when I woke up to a winter (spring?) wonderland this morning!  I took some pictures outside anyway, just for fun.


All you need to make these bow sleeves are a t-shirt, a pair of scissors, some machine washable glue (I used E6000), measuring tape, and about 10 minutes of your time.

Here are the directions:


1.  Cut a 2.5 inch slit from the top of the shoulder down toward the armpit on both the front and the back of the sleeve, making sure that you are cutting on the outside of the seam.  (This means your total slit length will be 5 inches.)  Once you've done that, there's a possibility that the shoulder seam might hang outside the shirt, like it is in the picture.  To avoid this, I cut the unsightly seam off of the shirt in the area where it was visible.  If yours doesn't hang out, there's no need to cut it off.  Repeat this process on the other sleeve as well.

2.  Carefully cut off the very bottom of the shirt, below the seam stitching.  Save this strip of fabric for step 3.  You'll be using it to make the center of the bow.


3. The strip of fabric from step 2 will be folded in half.  Unfold it and cut out two 2.5 inch strips.

4.  Use your fingers to pinch the center of one of the sleeves.

5.  Wrap one of the strips from step 3 around the sleeve where you pinched it.  Put a dab of glue on the end of the strip, where the star is in the picture.

6.  Fold the other end of the strip over the glue so that the strip becomes a circular band around the sleeve.  Pinch it tightly between your fingers to make sure that the glue is secure.  Repeat steps 3 through 6 on the other sleeve.  Let the glue dry before trying on your new creation!


I love my new shirt and I hope you like yours as well.  I can't wait for the weather to warm up again so I can wear it without the vest...

Happy cutting!
xoxo
Laura
Related Posts Plugin for WordPress, Blogger...